> ## Documentation Index
> Fetch the complete documentation index at: https://docs.inflection.io/llms.txt
> Use this file to discover all available pages before exploring further.
# Inbound Webhooks
> Connect to other third-party tools using inbound webhooks.
Inflection lets you ingest data from any third-party provider that supports outbound webhooks. With **Inbound Webhooks**, you receive data in **JSON format** and use it to **update contact properties** and **filter audiences inside journeys**. You can secure each webhook with different authentication methods to control who can send data.
We recommend limiting webhook submissions to 1,000 requests/minute. If you need higher throughput, reach out to your customer success team.
**Key concepts**
* **Connection provider**: The external system sending data to Inflection (for example, Zapier, a webinar tool, or a custom integration).
* **Inbound webhook connection**: The authenticated connection between Inflection and your provider, with its own endpoint URL, field mapping, and lifecycle state.
* **Group**: A subset of submissions within a connection, split by a field you choose (see [Group submissions](#group-submissions)).
## Step 1: Set Up an Inbound Webhook Connection
Creating a connection is a full-page, two-step flow: **Endpoint setup** → **Map fields**. There is no third step.
1. From the **Inbound Webhooks** list, click **Create**.
2. In the **Connection provider** panel, select **Generic Inbound Webhook**.
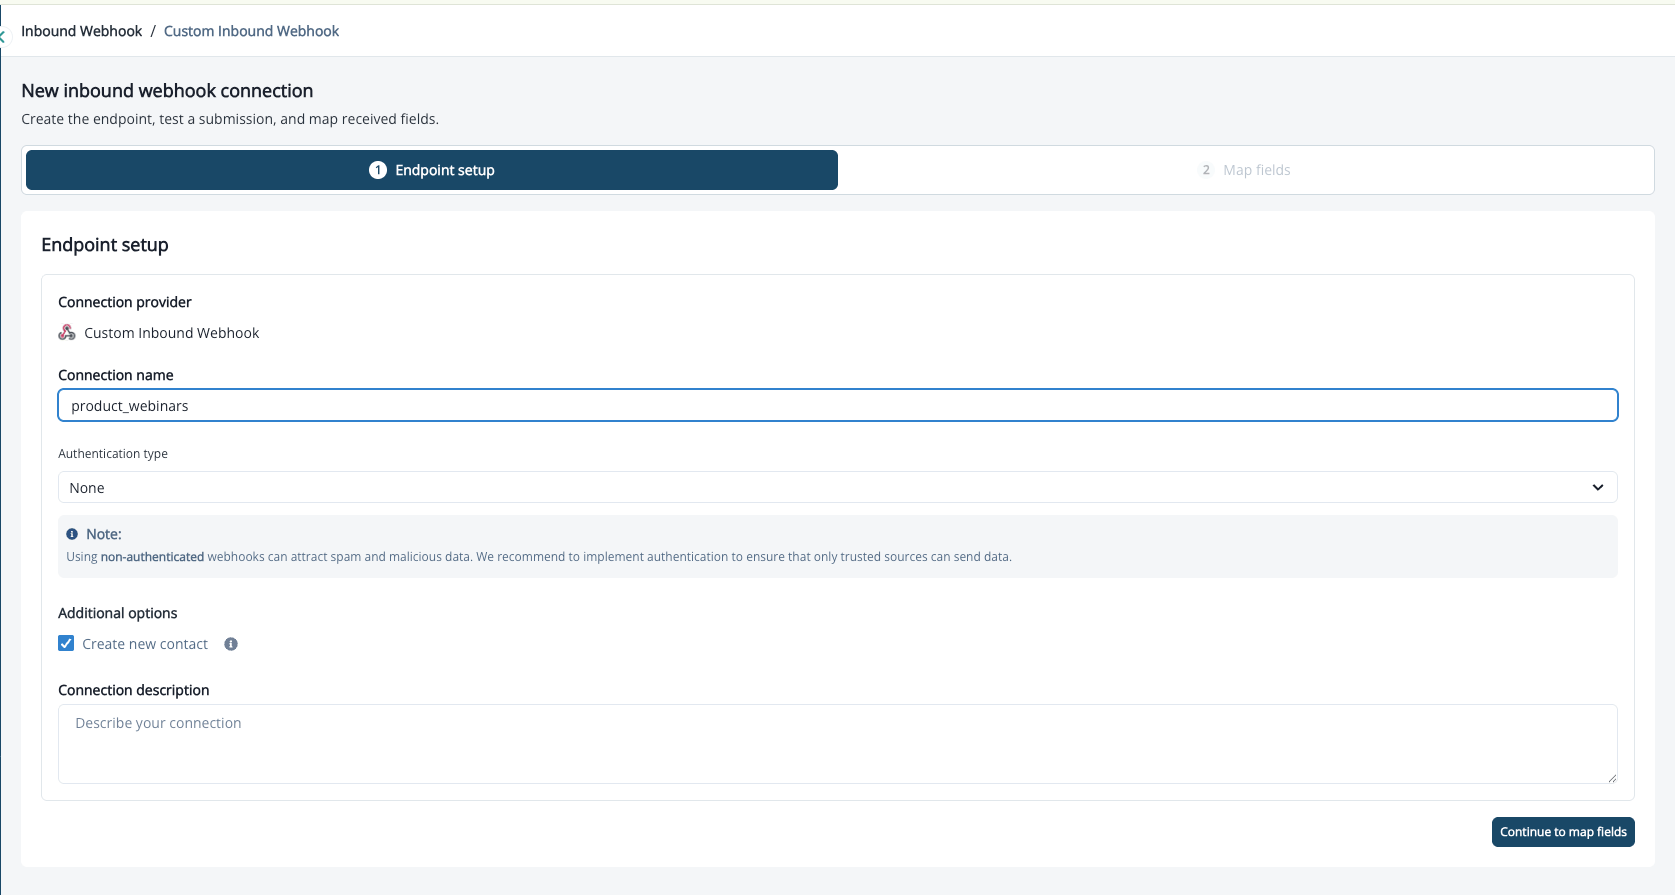 3. On the **Endpoint setup** step, fill in the connection details:
* **Connection name** (required). If you leave it empty, you'll see **Connection name should not be empty**.
* **Authentication** - choose the method that matches your security needs. While "No Auth" is available, we strongly recommend Basic Auth or API Key to prevent spam and unauthorized access.
* **Description** (optional).
* **Create contact** option - sets whether a new contact is created when an email address that isn't already in Inflection is received.
4. Click **Continue to map fields**.
### Authentication
Select the authentication option that matches your security requirements. Using No Auth can expose your webhook to spam and malicious data - Basic Auth or API Key is strongly recommended.
**No Auth**
No authentication. Anyone with the webhook URL can send data.
Not recommended. Risk of spam or malicious data.
**Basic Auth**
Uses a username and password combination.
* Credentials are hidden after setup. Copy and store them securely.
* To reset: Click **Reset Password** from the connection page and enter a new password. Update the password in your third-party system.
**API Key**
An API key is automatically generated.
* Configure in your third-party tool using **one** of the following methods:
* **Option 1 - Custom Header**: Key: `Authorization` / Value: `Bearer `
* **Option 2 - Bearer Token**: Paste the API key directly into the "Token" or "Authorization" field in your integration settings.
* To reset: Click **Refresh API Key** under Authentication Details. Update the API key in your third-party system.
Credentials are hidden after setup. If you reset credentials, update your third-party system immediately. The webhook URL remains unchanged. Once the connection is created, the authentication method cannot be changed.
## Step 2: Map Fields and Group Submissions
The **Map fields** step gives you everything you need to point your provider at Inflection and describe the payload it sends.
3. On the **Endpoint setup** step, fill in the connection details:
* **Connection name** (required). If you leave it empty, you'll see **Connection name should not be empty**.
* **Authentication** - choose the method that matches your security needs. While "No Auth" is available, we strongly recommend Basic Auth or API Key to prevent spam and unauthorized access.
* **Description** (optional).
* **Create contact** option - sets whether a new contact is created when an email address that isn't already in Inflection is received.
4. Click **Continue to map fields**.
### Authentication
Select the authentication option that matches your security requirements. Using No Auth can expose your webhook to spam and malicious data - Basic Auth or API Key is strongly recommended.
**No Auth**
No authentication. Anyone with the webhook URL can send data.
Not recommended. Risk of spam or malicious data.
**Basic Auth**
Uses a username and password combination.
* Credentials are hidden after setup. Copy and store them securely.
* To reset: Click **Reset Password** from the connection page and enter a new password. Update the password in your third-party system.
**API Key**
An API key is automatically generated.
* Configure in your third-party tool using **one** of the following methods:
* **Option 1 - Custom Header**: Key: `Authorization` / Value: `Bearer `
* **Option 2 - Bearer Token**: Paste the API key directly into the "Token" or "Authorization" field in your integration settings.
* To reset: Click **Refresh API Key** under Authentication Details. Update the API key in your third-party system.
Credentials are hidden after setup. If you reset credentials, update your third-party system immediately. The webhook URL remains unchanged. Once the connection is created, the authentication method cannot be changed.
## Step 2: Map Fields and Group Submissions
The **Map fields** step gives you everything you need to point your provider at Inflection and describe the payload it sends.
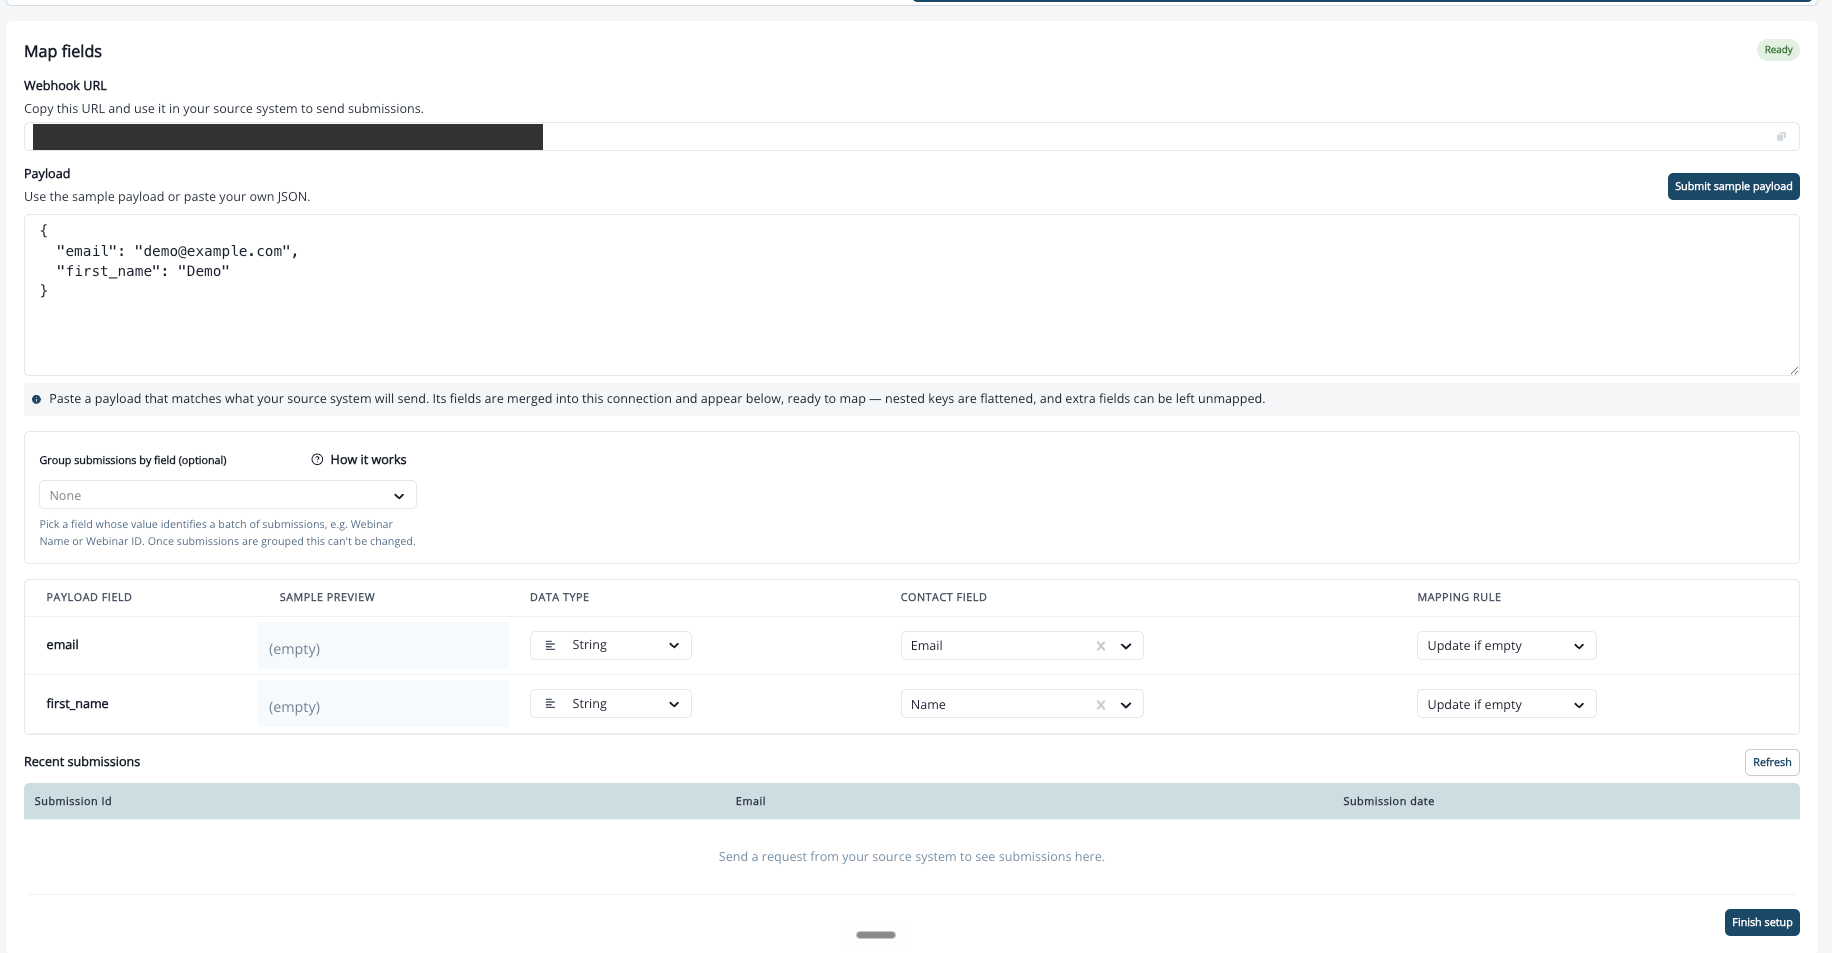 1. Copy the endpoint from the **Webhook URL** block using its copy control, then configure it (with any credentials) in your third-party tool.
2. In the **Payload** textarea, either paste your own JSON or use the sample that's prefilled for you:
```json theme={null}
{"email": "demo@example.com", "first_name": "Demo", "webinar_id": "july26"}
```
The helper text reads "Use the sample payload or paste your own JSON." If the JSON is invalid, you'll see **Enter a valid JSON object before submitting.**
3. Click **Submit sample payload**. On success you'll see **Payload received. Fields are ready to map.** and the detected fields populate the mapping table.
Nested JSON objects arrive **flattened** using dot notation. For example, `{"props": {"company": "Acme"}}` appears as the field `props.company`.
4. Map the detected fields to contact properties. The field-mapping table lists every field detected in your payload. It has four columns:
| Column | What it shows |
| - | - |
| **Payload field** | The field name from your JSON (dot notation for nested fields). |
| **Sample Preview** | The example value from the submitted payload. |
| **Contact field** | The contact property this field maps to. Unmapped rows show **None (Unmapped)**. |
| **Mapping rule** | How the value is applied: **Always overwrite** or **Update if empty**. |
5. Click **Save mapping** to persist your mapping. You must map the **Email** contact field before you can continue - if it isn't mapped, you'll see **Map the Email contact field before continuing.**
### Group Submissions
You can split a connection's submissions into groups based on a field in the payload - useful when one endpoint receives data for several sources (for example, one row per webinar).
* Use the **Group submissions by field (optional)** control to pick the grouping field.
* The **How it works** link opens a **How grouping works** explainer.
1. Copy the endpoint from the **Webhook URL** block using its copy control, then configure it (with any credentials) in your third-party tool.
2. In the **Payload** textarea, either paste your own JSON or use the sample that's prefilled for you:
```json theme={null}
{"email": "demo@example.com", "first_name": "Demo", "webinar_id": "july26"}
```
The helper text reads "Use the sample payload or paste your own JSON." If the JSON is invalid, you'll see **Enter a valid JSON object before submitting.**
3. Click **Submit sample payload**. On success you'll see **Payload received. Fields are ready to map.** and the detected fields populate the mapping table.
Nested JSON objects arrive **flattened** using dot notation. For example, `{"props": {"company": "Acme"}}` appears as the field `props.company`.
4. Map the detected fields to contact properties. The field-mapping table lists every field detected in your payload. It has four columns:
| Column | What it shows |
| - | - |
| **Payload field** | The field name from your JSON (dot notation for nested fields). |
| **Sample Preview** | The example value from the submitted payload. |
| **Contact field** | The contact property this field maps to. Unmapped rows show **None (Unmapped)**. |
| **Mapping rule** | How the value is applied: **Always overwrite** or **Update if empty**. |
5. Click **Save mapping** to persist your mapping. You must map the **Email** contact field before you can continue - if it isn't mapped, you'll see **Map the Email contact field before continuing.**
### Group Submissions
You can split a connection's submissions into groups based on a field in the payload - useful when one endpoint receives data for several sources (for example, one row per webinar).
* Use the **Group submissions by field (optional)** control to pick the grouping field.
* The **How it works** link opens a **How grouping works** explainer.
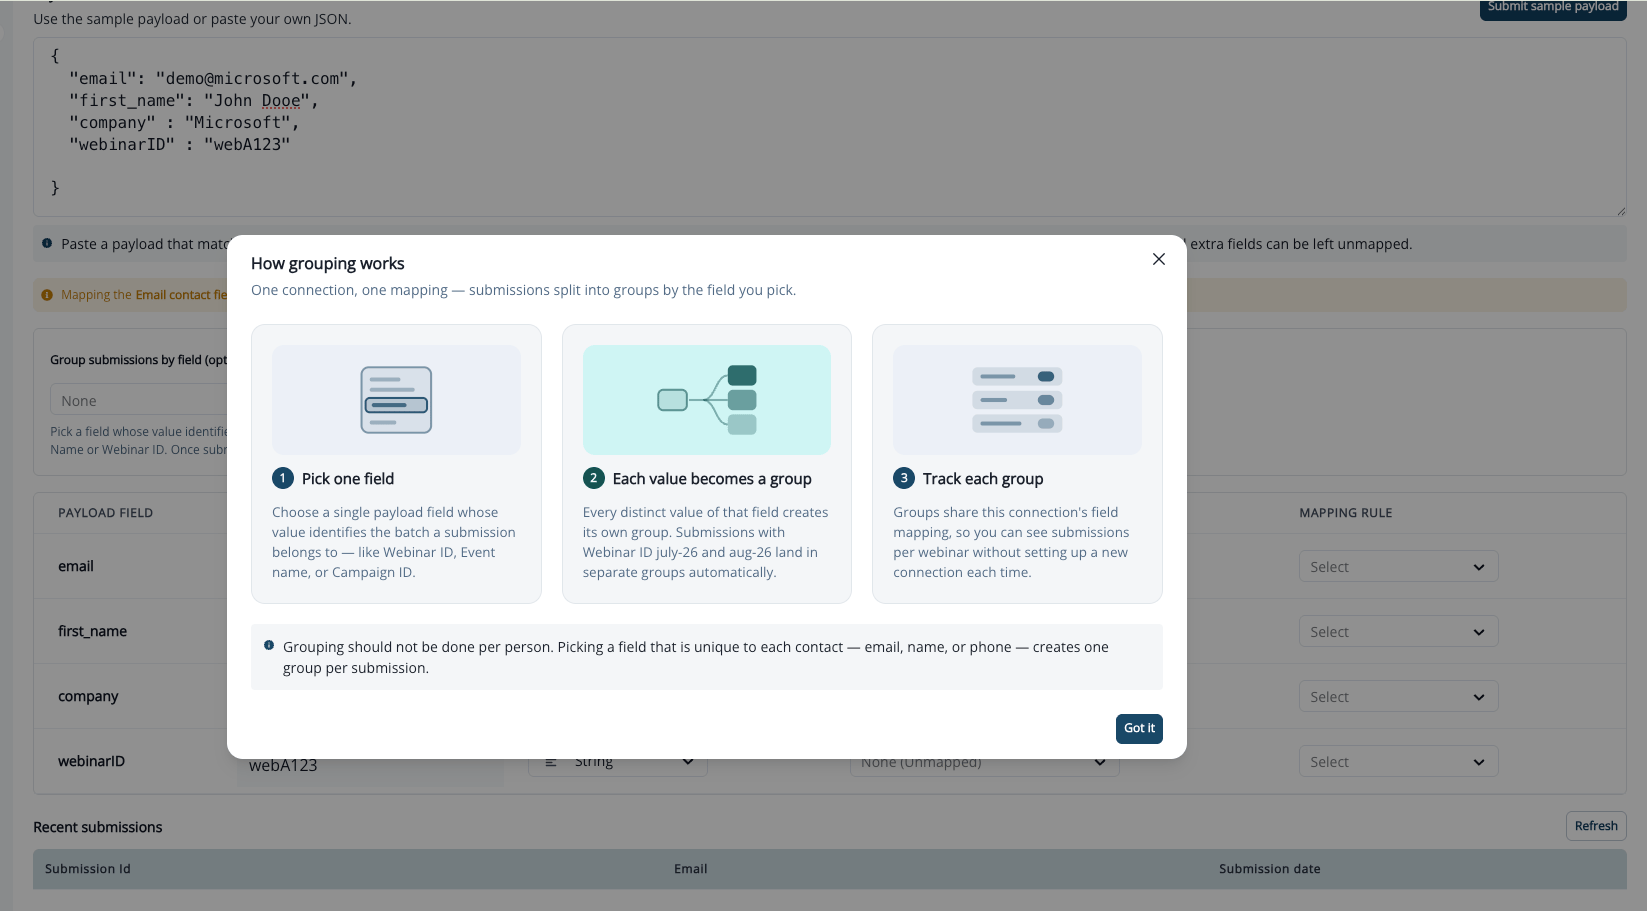 The grouping field is permanent. Once you set a grouping field and click **Finish setup**, it is locked for the life of the connection. If you reopen the setting later, it appears disabled with a lock icon and the text "Grouping is set once for a connection and can't be changed afterwards." Choose your grouping field carefully before finishing setup.
## Connection Detail Page
Each connection opens as a single scrolling page.
At the top are two badges:
* A **lifecycle** badge (see [Lifecycle actions](#lifecycle-actions)).
* A **readiness** badge (see the states below).
Below the badges, a stat strip shows four tiles: **Submissions**, **Groups**, **Errors**, and **Grouped By**.
The rest of the page includes:
* **Connection Details** card - lists Type, Create Contact, Last Activity, Authentication, Date Created, and **Processing Lane** (Real-time or Bulk - see [Processing Lanes](#processing-lanes)).
* **Endpoint URL** - with a copy control.
* **Connection Health** - includes a **View submission errors** action.
* **Groups table** - columns **Group**, **Submissions**, **Errors**, and actions, plus a **Refresh** control. If no groups exist yet, it shows a **Default group** placeholder row.
### Readiness States
The readiness badge tells you how far along the connection is:
| State | What it means |
| - | - |
| **Setup incomplete** | The connection is created but nothing has been received yet. |
| **Mapping needed** | A payload has arrived, but the mapping isn't finished. |
| **Ready** | Mapping is complete and the connection is processing data. |
| **New fields found** | A payload arrived containing a field that isn't mapped yet. |
## Lifecycle Actions
The **lifecycle** badge shows the connection's current state - a connection is **Active** while it is processing incoming data.
Use the lifecycle actions to control whether a connection is processing incoming data:
* **Pause** - Confirmation reads "Pausing stops incoming data processing until this connection is resumed." The confirm button is **Pause sync**. While paused, incoming POSTs are **rejected, not queued**.
* **Resume** - Sets a paused connection back to **Active**. Applies immediately, with no confirmation dialog.
* **Disable** - Confirmation reads "Once disabled, this connection will no longer process incoming data." Once disabled, a connection **cannot be self-resumed**.
Lifecycle actions and editing are available to **Admins** and **Editors**. They're hidden from **Viewers**.
## Delete a Connection
Deletion is available to **Admin** users only, and it isn't available from the list. To delete, open a group's actions on the connection detail page and choose delete.
If the group or connection is still referenced by journeys or dynamic lists, a modal blocks deletion and lists the blockers with links:
> The following journeys or audiences still reference these inbound webhooks. Remove every reference, then click Refresh.
The confirm button reads **Resolve dependencies to delete** and stays disabled until every reference is removed.
To free the connection for deletion:
1. Open each blocking journey or audience from its link and remove the inbound webhook reference, then save.
2. Return to the modal and click **Refresh**.
3. When no references remain, the block clears and you can delete the connection.
Removing a reference changes how that journey or dynamic list behaves. Confirm the reference is no longer needed before you remove it.
## Processing Lanes
Every inbound webhook connection is assigned to a **processing lane** - either **Real-time** or **Bulk**. Processing lanes isolate your webhook traffic so that high-volume submissions on one connection don't slow down another.
**How processing lanes work**
* Each customer gets **two separate lanes** for processing webhook data. One connection's traffic cannot congest the other lane.
* **There is no difference in processing speed between the two lanes.** Both Real-time and Bulk process submissions at the same rate. The names refer to the intended use case, not to a speed difference.
* Use **Real-time** for connections where speed-to-lead matters (for example, demo-request forms or high-priority lead sources).
* Use **Bulk** for high-volume, batch-style data imports where you want to keep the traffic separate from your real-time connections.
### Default Assignments
Existing connections are automatically assigned a default lane:
| Connection type | Default lane |
| - | - |
| Inbound webhook connections | Bulk |
| Custom form connections | Real-time |
You can change a connection's lane at any time from the **Connection Details** card on the connection detail page.
### Changing a Connection's Lane
1. Open the connection's detail page and open its settings for editing.
2. Under **Processing lane**, select one of the two options:
* **Real-time** - recommended for form submissions and low-to-moderate volume.
* **Bulk** - recommended for automations and high-volume sources.
3. Click **Save**.
The grouping field is permanent. Once you set a grouping field and click **Finish setup**, it is locked for the life of the connection. If you reopen the setting later, it appears disabled with a lock icon and the text "Grouping is set once for a connection and can't be changed afterwards." Choose your grouping field carefully before finishing setup.
## Connection Detail Page
Each connection opens as a single scrolling page.
At the top are two badges:
* A **lifecycle** badge (see [Lifecycle actions](#lifecycle-actions)).
* A **readiness** badge (see the states below).
Below the badges, a stat strip shows four tiles: **Submissions**, **Groups**, **Errors**, and **Grouped By**.
The rest of the page includes:
* **Connection Details** card - lists Type, Create Contact, Last Activity, Authentication, Date Created, and **Processing Lane** (Real-time or Bulk - see [Processing Lanes](#processing-lanes)).
* **Endpoint URL** - with a copy control.
* **Connection Health** - includes a **View submission errors** action.
* **Groups table** - columns **Group**, **Submissions**, **Errors**, and actions, plus a **Refresh** control. If no groups exist yet, it shows a **Default group** placeholder row.
### Readiness States
The readiness badge tells you how far along the connection is:
| State | What it means |
| - | - |
| **Setup incomplete** | The connection is created but nothing has been received yet. |
| **Mapping needed** | A payload has arrived, but the mapping isn't finished. |
| **Ready** | Mapping is complete and the connection is processing data. |
| **New fields found** | A payload arrived containing a field that isn't mapped yet. |
## Lifecycle Actions
The **lifecycle** badge shows the connection's current state - a connection is **Active** while it is processing incoming data.
Use the lifecycle actions to control whether a connection is processing incoming data:
* **Pause** - Confirmation reads "Pausing stops incoming data processing until this connection is resumed." The confirm button is **Pause sync**. While paused, incoming POSTs are **rejected, not queued**.
* **Resume** - Sets a paused connection back to **Active**. Applies immediately, with no confirmation dialog.
* **Disable** - Confirmation reads "Once disabled, this connection will no longer process incoming data." Once disabled, a connection **cannot be self-resumed**.
Lifecycle actions and editing are available to **Admins** and **Editors**. They're hidden from **Viewers**.
## Delete a Connection
Deletion is available to **Admin** users only, and it isn't available from the list. To delete, open a group's actions on the connection detail page and choose delete.
If the group or connection is still referenced by journeys or dynamic lists, a modal blocks deletion and lists the blockers with links:
> The following journeys or audiences still reference these inbound webhooks. Remove every reference, then click Refresh.
The confirm button reads **Resolve dependencies to delete** and stays disabled until every reference is removed.
To free the connection for deletion:
1. Open each blocking journey or audience from its link and remove the inbound webhook reference, then save.
2. Return to the modal and click **Refresh**.
3. When no references remain, the block clears and you can delete the connection.
Removing a reference changes how that journey or dynamic list behaves. Confirm the reference is no longer needed before you remove it.
## Processing Lanes
Every inbound webhook connection is assigned to a **processing lane** - either **Real-time** or **Bulk**. Processing lanes isolate your webhook traffic so that high-volume submissions on one connection don't slow down another.
**How processing lanes work**
* Each customer gets **two separate lanes** for processing webhook data. One connection's traffic cannot congest the other lane.
* **There is no difference in processing speed between the two lanes.** Both Real-time and Bulk process submissions at the same rate. The names refer to the intended use case, not to a speed difference.
* Use **Real-time** for connections where speed-to-lead matters (for example, demo-request forms or high-priority lead sources).
* Use **Bulk** for high-volume, batch-style data imports where you want to keep the traffic separate from your real-time connections.
### Default Assignments
Existing connections are automatically assigned a default lane:
| Connection type | Default lane |
| - | - |
| Inbound webhook connections | Bulk |
| Custom form connections | Real-time |
You can change a connection's lane at any time from the **Connection Details** card on the connection detail page.
### Changing a Connection's Lane
1. Open the connection's detail page and open its settings for editing.
2. Under **Processing lane**, select one of the two options:
* **Real-time** - recommended for form submissions and low-to-moderate volume.
* **Bulk** - recommended for automations and high-volume sources.
3. Click **Save**.
 The change takes effect immediately for new incoming submissions.
## Use Inbound Webhooks in Journeys
You can use webhook submissions as audience filters or branching criteria:
1. Navigate to **Journeys → Create New Journey**.
2. Add a condition: **Performed a Marketing Activity → Inbound webhook sync**.
You can also use **Branch by Filter** to personalize flows based on any mapped field.
## Examples for Inbound Webhook Setup
**General purpose enterprise automation platform**
[Zapier](/connections/webhooks/zapier)
**Social lead generation**
[Linkedin](/connections/webhooks/linkedin)
**Webinars**
[Zoom](/connections/webhooks/zoom)
[Goldcast](/connections/webhooks/goldcast)
**Enrichment**
[Clearbit](/connections/webhooks/clearbit)
[Clay](/connections/webhooks/clay)
**Data sync with CRMs/MAPs**
[Marketo](/connections/webhooks/marketo)
[Hubspot](/connections/webhooks/hubspot)
**Forms**
[Formsite](https://support.formsite.com/hc/en-us/articles/360000546194-Webhooks)
[Typeform](https://www.typeform.com/developers/webhooks/)
## Inbound Webhooks FAQs
The names describe the **intended use case**, not a speed difference. Both lanes process data at the same rate. "Real-time" is meant for connections where you want fast, isolated processing (like lead-capture forms), and "Bulk" is for high-volume imports you want to keep on a separate lane. The key benefit is **traffic isolation** - one lane's load cannot affect the other.
This documentation is built and hosted on [Mintlify](https://mintlify.com), a developer documentation platform.
The change takes effect immediately for new incoming submissions.
## Use Inbound Webhooks in Journeys
You can use webhook submissions as audience filters or branching criteria:
1. Navigate to **Journeys → Create New Journey**.
2. Add a condition: **Performed a Marketing Activity → Inbound webhook sync**.
You can also use **Branch by Filter** to personalize flows based on any mapped field.
## Examples for Inbound Webhook Setup
**General purpose enterprise automation platform**
[Zapier](/connections/webhooks/zapier)
**Social lead generation**
[Linkedin](/connections/webhooks/linkedin)
**Webinars**
[Zoom](/connections/webhooks/zoom)
[Goldcast](/connections/webhooks/goldcast)
**Enrichment**
[Clearbit](/connections/webhooks/clearbit)
[Clay](/connections/webhooks/clay)
**Data sync with CRMs/MAPs**
[Marketo](/connections/webhooks/marketo)
[Hubspot](/connections/webhooks/hubspot)
**Forms**
[Formsite](https://support.formsite.com/hc/en-us/articles/360000546194-Webhooks)
[Typeform](https://www.typeform.com/developers/webhooks/)
## Inbound Webhooks FAQs
The names describe the **intended use case**, not a speed difference. Both lanes process data at the same rate. "Real-time" is meant for connections where you want fast, isolated processing (like lead-capture forms), and "Bulk" is for high-volume imports you want to keep on a separate lane. The key benefit is **traffic isolation** - one lane's load cannot affect the other.
This documentation is built and hosted on [Mintlify](https://mintlify.com), a developer documentation platform.