> ## Documentation Index
> Fetch the complete documentation index at: https://docs.inflection.io/llms.txt
> Use this file to discover all available pages before exploring further.
# Custom Forms
> Collect prospect or customer responses using Inflection's forms API.
Inflection lets you ingest data from any third-party form tool that supports outbound webhooks. With a custom form connection, you receive data in JSON format and use it to update contact properties or filter audiences inside journeys. You can secure each connection with different authentication methods.
**Key concepts:**
* **Form provider**: The external tool you're using to collect submissions (e.g., Typeform, Jotform).
* **Custom form connection**: The authenticated webhook connection between Inflection and your form provider.
* **Group**: A subset of submissions within a connection, split by a field you choose - used to separate submissions from multiple forms on one connection.
## Step 1: Set Up a Custom Form Connection
A custom form connection uses the **same two-step flow as inbound webhooks**: **Endpoint setup** → **Map fields**, finishing with **Continue to map fields** and then **Finish setup**.
1. Navigate to **Forms** in the main sidebar (Forms is now a top-level item - see [Inflection Forms](/connections/inflection-forms#create-a-form)).
2. Click **New Form** and, in the **Create form** drawer, choose **Custom form connection**.
3. On the **Endpoint setup** step, enter a connection name (required), authentication, an optional description, and the create-contact option, then click **Continue to map fields**.
4. On the **Map fields** step, copy the **Webhook URL** into your form provider, then submit a sample payload and map the detected fields.
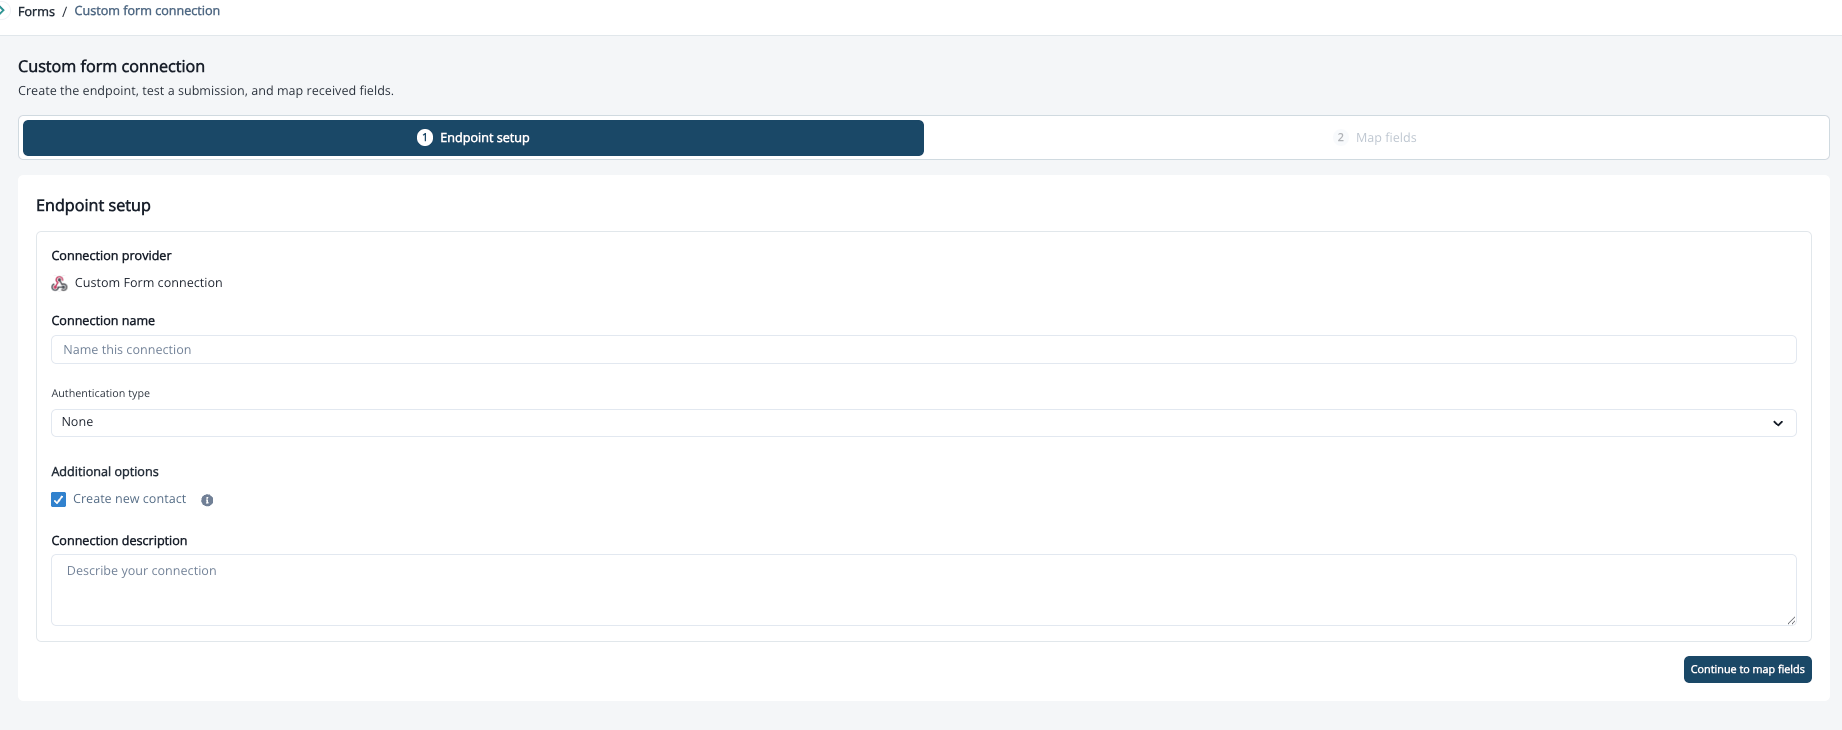 The sample-payload submission, the field-mapping table, and grouping all work exactly as they do for inbound webhooks - see [Step 2: Map Fields and Group Submissions](#step-2-map-fields-and-group-submissions) below for the full walkthrough.
### Connection Detail Page
A custom form connection opens as a single scrolling page, the same as an inbound webhook connection.
At the top are two badges:
* A **lifecycle** badge (see [Lifecycle actions](#lifecycle-actions)).
* A **readiness** badge showing how far along the connection is: **Setup incomplete**, **Mapping needed**, **Ready**, or **New fields found**.
Below the badges, a stat strip shows four tiles: **Submissions**, **Groups**, **Errors**, and **Grouped By**.
The rest of the page includes:
* **Connection Details** card - lists Type, Create Contact, Last Activity, Authentication, Date Created, and **Processing Lane** (Real-time or Bulk - controls which ingestion lane this connection uses; see [Processing Lanes](#processing-lanes)). For a custom form connection, **Type** reads **Form API**.
* **Endpoint URL** - with a copy control.
* **Connection Health** - includes a **View submission errors** action.
* **Groups table** - columns **Group**, **Submissions**, **Errors**, and actions, plus a **Refresh** control. Connected form assets appear as rows here.
Submission errors surface under **Connection Health** - use **View submission errors** to review them.
### Authentication
Select the authentication option that matches your security requirements. Using No Auth can expose your webhook to spam and malicious data — Basic Auth or API Key is strongly recommended.
**No Auth**
No authentication. Anyone with the webhook URL can send data.
Not recommended. Risk of spam or malicious data.
**Basic Auth**
Uses a username and password combination.
* Credentials are hidden after setup. Copy and store them securely.
* To reset: Click **Reset Password** from the connection page and enter a new password. Update the password in your third-party system.
**API Key**
An API key is automatically generated.
* Configure in your form provider using **one** of the following methods:
* **Option 1 — Custom Header**: Key: `Authorization` / Value: `Bearer `
* **Option 2 — Bearer Token**: Paste the API key directly into the "Token" or "Authorization" field in your integration settings.
* To reset: Click **Refresh API Key** under Authentication Details. Update the API key in your third-party system.
Credentials are hidden after setup. If you reset credentials, update your third-party system immediately. The webhook URL remains unchanged. Once the connection is created, the authentication method cannot be changed.
### Lifecycle Actions
A custom form connection uses the same lifecycle actions as an inbound webhook. The **lifecycle** badge shows the connection's current state - a connection is **Active** while it is processing incoming data. Use the lifecycle actions to control that:
* **Pause** - Confirmation reads "Pausing stops incoming data processing until this connection is resumed." The confirm button is **Pause sync**. While paused, incoming POSTs are **rejected, not queued**.
* **Resume** - Sets a paused connection back to **Active**. Applies immediately, with no confirmation dialog.
* **Disable** - Confirmation reads "Once disabled, this connection will no longer process incoming data." Once disabled, a connection **cannot be self-resumed**.
Lifecycle actions and editing are available to **Admins** and **Editors**. They're hidden from **Viewers**.
## Step 2: Map Fields and Group Submissions
Field mapping happens on the **Map fields** step of the two-step flow, not as a separate enable step.
The sample-payload submission, the field-mapping table, and grouping all work exactly as they do for inbound webhooks - see [Step 2: Map Fields and Group Submissions](#step-2-map-fields-and-group-submissions) below for the full walkthrough.
### Connection Detail Page
A custom form connection opens as a single scrolling page, the same as an inbound webhook connection.
At the top are two badges:
* A **lifecycle** badge (see [Lifecycle actions](#lifecycle-actions)).
* A **readiness** badge showing how far along the connection is: **Setup incomplete**, **Mapping needed**, **Ready**, or **New fields found**.
Below the badges, a stat strip shows four tiles: **Submissions**, **Groups**, **Errors**, and **Grouped By**.
The rest of the page includes:
* **Connection Details** card - lists Type, Create Contact, Last Activity, Authentication, Date Created, and **Processing Lane** (Real-time or Bulk - controls which ingestion lane this connection uses; see [Processing Lanes](#processing-lanes)). For a custom form connection, **Type** reads **Form API**.
* **Endpoint URL** - with a copy control.
* **Connection Health** - includes a **View submission errors** action.
* **Groups table** - columns **Group**, **Submissions**, **Errors**, and actions, plus a **Refresh** control. Connected form assets appear as rows here.
Submission errors surface under **Connection Health** - use **View submission errors** to review them.
### Authentication
Select the authentication option that matches your security requirements. Using No Auth can expose your webhook to spam and malicious data — Basic Auth or API Key is strongly recommended.
**No Auth**
No authentication. Anyone with the webhook URL can send data.
Not recommended. Risk of spam or malicious data.
**Basic Auth**
Uses a username and password combination.
* Credentials are hidden after setup. Copy and store them securely.
* To reset: Click **Reset Password** from the connection page and enter a new password. Update the password in your third-party system.
**API Key**
An API key is automatically generated.
* Configure in your form provider using **one** of the following methods:
* **Option 1 — Custom Header**: Key: `Authorization` / Value: `Bearer `
* **Option 2 — Bearer Token**: Paste the API key directly into the "Token" or "Authorization" field in your integration settings.
* To reset: Click **Refresh API Key** under Authentication Details. Update the API key in your third-party system.
Credentials are hidden after setup. If you reset credentials, update your third-party system immediately. The webhook URL remains unchanged. Once the connection is created, the authentication method cannot be changed.
### Lifecycle Actions
A custom form connection uses the same lifecycle actions as an inbound webhook. The **lifecycle** badge shows the connection's current state - a connection is **Active** while it is processing incoming data. Use the lifecycle actions to control that:
* **Pause** - Confirmation reads "Pausing stops incoming data processing until this connection is resumed." The confirm button is **Pause sync**. While paused, incoming POSTs are **rejected, not queued**.
* **Resume** - Sets a paused connection back to **Active**. Applies immediately, with no confirmation dialog.
* **Disable** - Confirmation reads "Once disabled, this connection will no longer process incoming data." Once disabled, a connection **cannot be self-resumed**.
Lifecycle actions and editing are available to **Admins** and **Editors**. They're hidden from **Viewers**.
## Step 2: Map Fields and Group Submissions
Field mapping happens on the **Map fields** step of the two-step flow, not as a separate enable step.
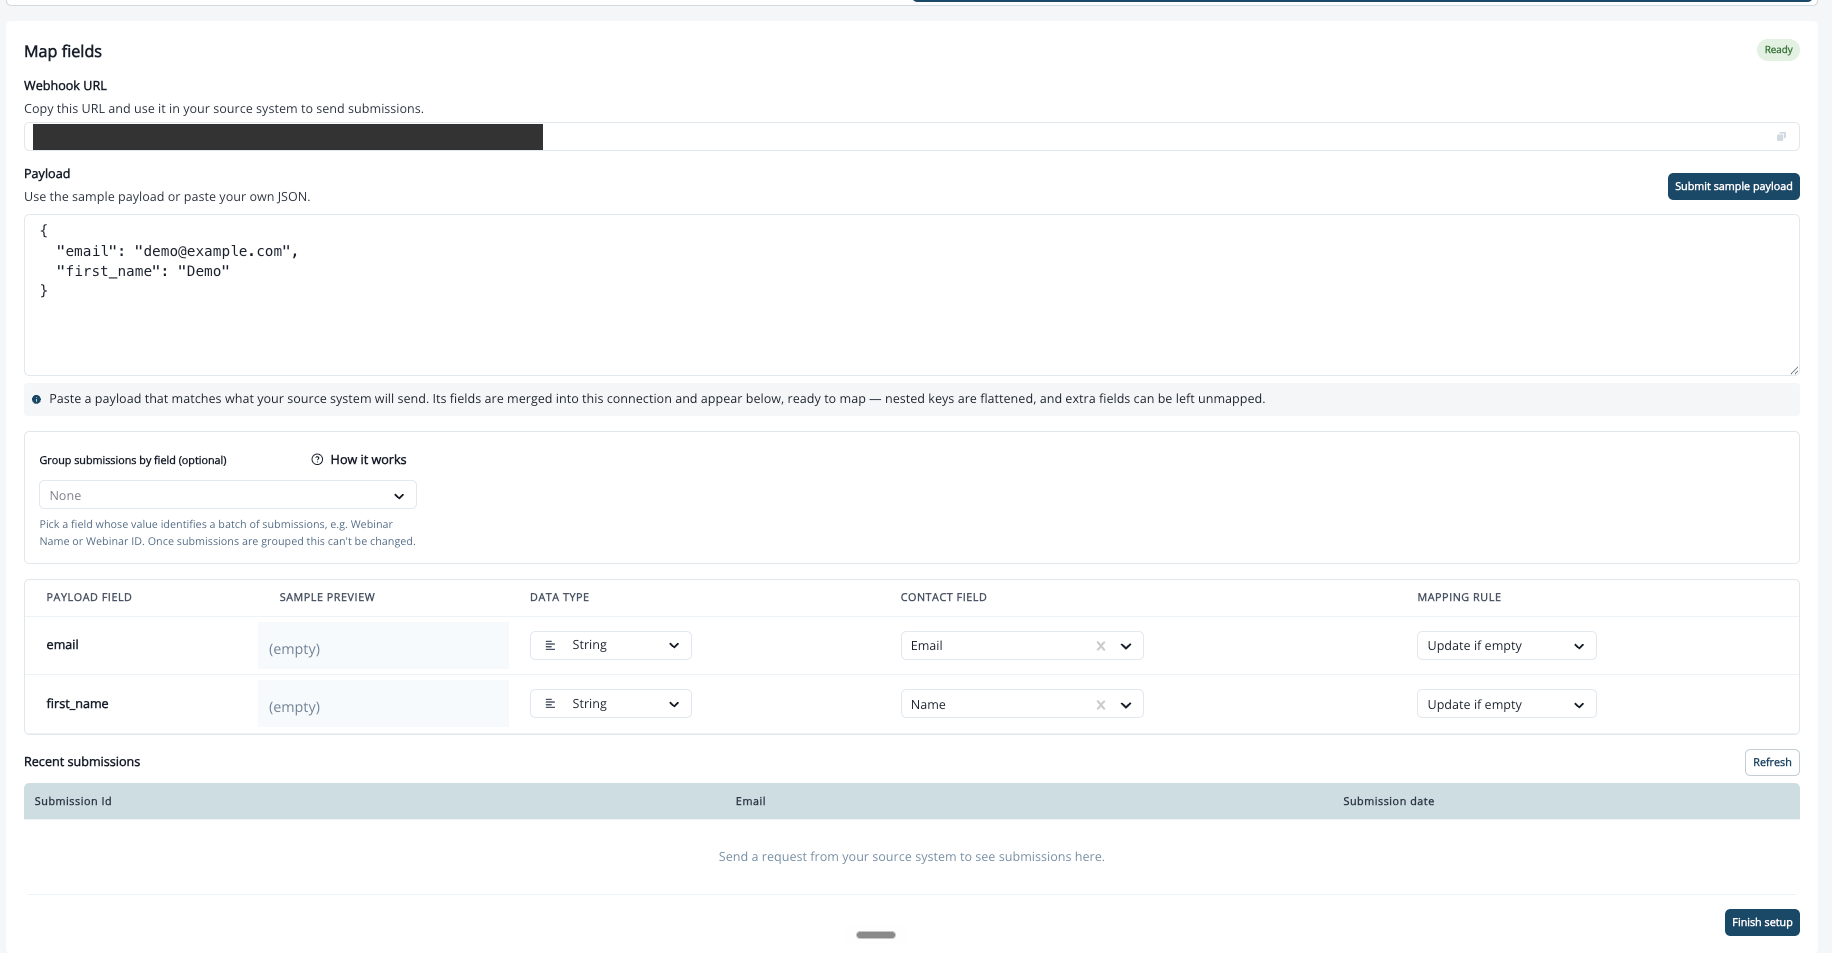 1. Copy the endpoint from the **Webhook URL** block using its copy control, then configure it (with any credentials) in your form provider.
2. In the **Payload** textarea, either paste your own JSON or use the sample that's prefilled for you. The helper text reads "Use the sample payload or paste your own JSON." If the JSON is invalid, you'll see **Enter a valid JSON object before submitting.**
3. Click **Submit sample payload**. On success you'll see **Payload received. Fields are ready to map.** and the detected fields populate the mapping table.
Nested JSON objects arrive **flattened** using dot notation. For example, `{"props": {"company": "Acme"}}` appears as the field `props.company`.
The field-mapping table lists every field detected in your payload. It has four columns:
| Column | What it shows |
| - | - |
| **Payload field** | The field name from your JSON (dot notation for nested fields). |
| **Sample Preview** | The example value from the submitted payload. |
| **Contact field** | The contact property this field maps to. Unmapped rows show **None (Unmapped)**. |
| **Mapping rule** | How the value is applied: **Always overwrite** or **Update if empty**. |
You must map the **Email** contact field before you can continue. If it isn't mapped, you'll see **Map the Email contact field before continuing.**
Click **Save mapping** to persist your mapping.
### Group Submissions
To split submissions from multiple forms on one connection, group them by a field in the payload:
* Use the **Group submissions by field (optional)** control to pick the grouping field.
* The **How it works** link opens a **How grouping works** explainer.
1. Copy the endpoint from the **Webhook URL** block using its copy control, then configure it (with any credentials) in your form provider.
2. In the **Payload** textarea, either paste your own JSON or use the sample that's prefilled for you. The helper text reads "Use the sample payload or paste your own JSON." If the JSON is invalid, you'll see **Enter a valid JSON object before submitting.**
3. Click **Submit sample payload**. On success you'll see **Payload received. Fields are ready to map.** and the detected fields populate the mapping table.
Nested JSON objects arrive **flattened** using dot notation. For example, `{"props": {"company": "Acme"}}` appears as the field `props.company`.
The field-mapping table lists every field detected in your payload. It has four columns:
| Column | What it shows |
| - | - |
| **Payload field** | The field name from your JSON (dot notation for nested fields). |
| **Sample Preview** | The example value from the submitted payload. |
| **Contact field** | The contact property this field maps to. Unmapped rows show **None (Unmapped)**. |
| **Mapping rule** | How the value is applied: **Always overwrite** or **Update if empty**. |
You must map the **Email** contact field before you can continue. If it isn't mapped, you'll see **Map the Email contact field before continuing.**
Click **Save mapping** to persist your mapping.
### Group Submissions
To split submissions from multiple forms on one connection, group them by a field in the payload:
* Use the **Group submissions by field (optional)** control to pick the grouping field.
* The **How it works** link opens a **How grouping works** explainer.
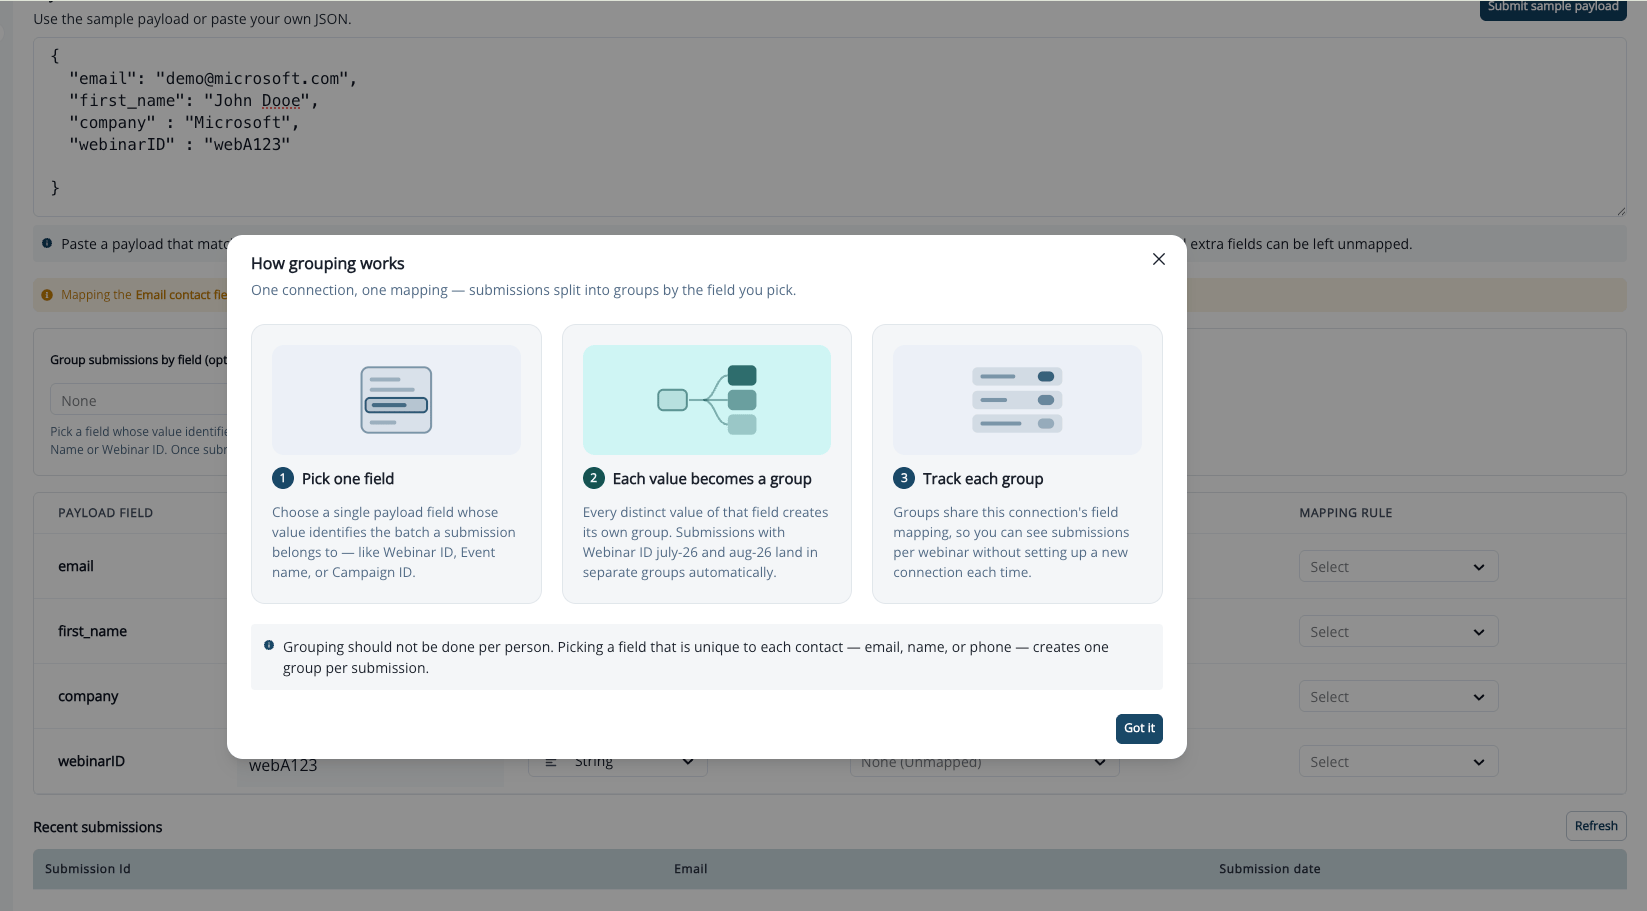 The grouping field is permanent. Once you set a grouping field and click **Finish setup**, it is locked for the life of the connection. If you reopen the setting later, it appears disabled with a lock icon and the text "Grouping is set once for a connection and can't be changed afterwards." Choose your grouping field carefully before finishing setup.
## Review Submission Errors
Submission errors surface under **Connection Health** on the connection detail page - click **View submission errors** to review them. Common errors and fixes:
* **"No valid email present in submission"** → Ensure the email field is mapped.
* **"Obtained email is not valid"** → Verify the correct email format is being sent.
* **"Mapping failed due to date format error"** → Check date format compatibility between your form tool and the contact property.
## Processing Lanes
Every custom form connection is assigned to a **processing lane** - either **Real-time** or **Bulk**. Processing lanes isolate your webhook traffic so that high-volume submissions on one connection don't slow down another.
**How processing lanes work**
* Each customer gets **two separate lanes** for processing webhook data. One connection's traffic cannot congest the other lane.
* **There is no difference in processing speed between the two lanes.** Both Real-time and Bulk process submissions at the same rate. The names refer to the intended use case, not to a speed difference.
* Use **Real-time** for connections where speed-to-lead matters (for example, demo-request forms or high-priority lead sources).
* Use **Bulk** for high-volume, batch-style data imports where you want to keep the traffic separate from your real-time connections.
### Default Assignments
Existing connections are automatically assigned a default lane:
| Connection type | Default lane |
| - | - |
| Inbound webhook connections | Bulk |
| Custom form connections | Real-time |
You can change a connection's lane at any time from the **Connection Details** card on the connection detail page.
### Changing a Connection's Lane
1. Open the connection's detail page and open its settings for editing.
2. Under **Processing lane**, select one of the two options:
* **Real-time** - recommended for form submissions and low-to-moderate volume.
* **Bulk** - recommended for automations and high-volume sources.
3. Click **Save**.
The grouping field is permanent. Once you set a grouping field and click **Finish setup**, it is locked for the life of the connection. If you reopen the setting later, it appears disabled with a lock icon and the text "Grouping is set once for a connection and can't be changed afterwards." Choose your grouping field carefully before finishing setup.
## Review Submission Errors
Submission errors surface under **Connection Health** on the connection detail page - click **View submission errors** to review them. Common errors and fixes:
* **"No valid email present in submission"** → Ensure the email field is mapped.
* **"Obtained email is not valid"** → Verify the correct email format is being sent.
* **"Mapping failed due to date format error"** → Check date format compatibility between your form tool and the contact property.
## Processing Lanes
Every custom form connection is assigned to a **processing lane** - either **Real-time** or **Bulk**. Processing lanes isolate your webhook traffic so that high-volume submissions on one connection don't slow down another.
**How processing lanes work**
* Each customer gets **two separate lanes** for processing webhook data. One connection's traffic cannot congest the other lane.
* **There is no difference in processing speed between the two lanes.** Both Real-time and Bulk process submissions at the same rate. The names refer to the intended use case, not to a speed difference.
* Use **Real-time** for connections where speed-to-lead matters (for example, demo-request forms or high-priority lead sources).
* Use **Bulk** for high-volume, batch-style data imports where you want to keep the traffic separate from your real-time connections.
### Default Assignments
Existing connections are automatically assigned a default lane:
| Connection type | Default lane |
| - | - |
| Inbound webhook connections | Bulk |
| Custom form connections | Real-time |
You can change a connection's lane at any time from the **Connection Details** card on the connection detail page.
### Changing a Connection's Lane
1. Open the connection's detail page and open its settings for editing.
2. Under **Processing lane**, select one of the two options:
* **Real-time** - recommended for form submissions and low-to-moderate volume.
* **Bulk** - recommended for automations and high-volume sources.
3. Click **Save**.
 The change takes effect immediately for new incoming submissions.
## Using Form Submissions in Journeys
You can use custom form submissions within **Journeys** for automated follow-up.
1. Navigate to **Journeys → Create New Journey** (or open an existing journey).
2. Add an entry condition: **Performed a Marketing Activity → Submitted a form**.
3. Select the specific form asset to trigger the journey.
You can also use form submissions in **Branch by Filter** to tailor communications based on specific field values submitted.
Every data sync event is recorded under the **Marketing Activity** tab for each contact. You can also filter contacts in **Dynamic Lists** using form submission data by applying conditions based on specific form fields.
## Supported Form Providers
Inflection's API / Custom Forms approach works with any tool that can POST JSON to a webhook URL. Below are step-by-step guides for Webflow and Formstack, followed by links for other supported providers.
Both Webflow and Formstack start from the **Create form** drawer (**New Form → Webflow form** or **Formstack form**). Step 1 shows the provider webhook URL with a copy control, then a **Submission test** step you can **skip**. You can **Disconnect** a provider at any time from its connection page.
### Connecting Webflow Forms
1. In the **Create form** drawer, choose **Webflow form**.
2. Copy the shown provider webhook URL and go to your Webflow site builder.
3. In your Webflow dashboard, go to **Site Settings → Apps & Integrations → Webhooks**. Click **Add Webhook**. Set the configuration as shown and paste the copied link into the **Webhook URL** field.
Inflection only supports **API V1** for Webflow.
4. Return to Inflection to reach the **Submission test** step. Submit a test form to verify the setup (recommended), or skip this step.
5. Submissions from your Webflow forms will now appear in Inflection.
A Webflow form's name is not editable in Inflection - the field shows the tooltip "Webflow form name is not updatable".
### Connecting Formstack Forms
1. In the **Create form** drawer, choose **Formstack form**.
2. Copy both the **webhook link** and the **shared secret key** shown in Inflection (Formstack requires the shared secret in addition to the URL), then go to your Formstack form builder.
3. In Formstack, open your form and go to **Form Settings → Emails & Actions → Advanced Settings → Add a Webhook**. Click **Add a Webhook** and configure as follows:
* **Webhook URL**: Paste the link copied from Inflection.
* **Shared Secret**: Paste the secret key copied from Inflection.
* Leave all other settings exactly as shown in the Formstack webhook configuration screen.
Ensure that the Webhook settings are configured exactly as shown above.
4. Return to Inflection to reach the **Submission test** step. Provide a test submission to verify the setup (recommended), or skip this step.
5. Submissions from your Formstack forms will now appear in Inflection.
### Other Commonly Used Providers
Inflection works with any form tool that supports outbound webhooks posting JSON. External setup guides:
* [Typeform](https://www.typeform.com/developers/webhooks/)
* [Jotform](https://www.jotform.com/integrations/webhooks)
* [Formsite](https://support.formsite.com/hc/en-us/articles/360000546194-Webhooks)
* [SurveyMonkey](https://help.surveymonkey.com/en/apply/build/webhook-overview/)
* [Feathery.io](http://Feathery.io)
* [Fillout](https://www.fillout.com/help/webhook)
* [Zoho Forms](https://help.zoho.com/portal/en/kb/forms/integrations/webhooks/articles/webhook-configuration)
* [Form.io](http://Form.io)
* [QuestionScout](https://support.questionscout.com/article/26-webhooks)
* [Paperform](https://paperform.co/help/articles/how-to-use-webhooks/)
## Custom Forms FAQs
Custom form connections default to **Real-time** because form submissions - like demo requests or event registrations - are typically time-sensitive and benefit from isolated, priority processing. If your form handles high-volume batch imports instead, you can switch it to **Bulk** from the **Connection Details** card. Both lanes process data at the same speed; the separation ensures one connection's traffic doesn't affect the other.
This documentation is built and hosted on [Mintlify](https://mintlify.com), a developer documentation platform.
The change takes effect immediately for new incoming submissions.
## Using Form Submissions in Journeys
You can use custom form submissions within **Journeys** for automated follow-up.
1. Navigate to **Journeys → Create New Journey** (or open an existing journey).
2. Add an entry condition: **Performed a Marketing Activity → Submitted a form**.
3. Select the specific form asset to trigger the journey.
You can also use form submissions in **Branch by Filter** to tailor communications based on specific field values submitted.
Every data sync event is recorded under the **Marketing Activity** tab for each contact. You can also filter contacts in **Dynamic Lists** using form submission data by applying conditions based on specific form fields.
## Supported Form Providers
Inflection's API / Custom Forms approach works with any tool that can POST JSON to a webhook URL. Below are step-by-step guides for Webflow and Formstack, followed by links for other supported providers.
Both Webflow and Formstack start from the **Create form** drawer (**New Form → Webflow form** or **Formstack form**). Step 1 shows the provider webhook URL with a copy control, then a **Submission test** step you can **skip**. You can **Disconnect** a provider at any time from its connection page.
### Connecting Webflow Forms
1. In the **Create form** drawer, choose **Webflow form**.
2. Copy the shown provider webhook URL and go to your Webflow site builder.
3. In your Webflow dashboard, go to **Site Settings → Apps & Integrations → Webhooks**. Click **Add Webhook**. Set the configuration as shown and paste the copied link into the **Webhook URL** field.
Inflection only supports **API V1** for Webflow.
4. Return to Inflection to reach the **Submission test** step. Submit a test form to verify the setup (recommended), or skip this step.
5. Submissions from your Webflow forms will now appear in Inflection.
A Webflow form's name is not editable in Inflection - the field shows the tooltip "Webflow form name is not updatable".
### Connecting Formstack Forms
1. In the **Create form** drawer, choose **Formstack form**.
2. Copy both the **webhook link** and the **shared secret key** shown in Inflection (Formstack requires the shared secret in addition to the URL), then go to your Formstack form builder.
3. In Formstack, open your form and go to **Form Settings → Emails & Actions → Advanced Settings → Add a Webhook**. Click **Add a Webhook** and configure as follows:
* **Webhook URL**: Paste the link copied from Inflection.
* **Shared Secret**: Paste the secret key copied from Inflection.
* Leave all other settings exactly as shown in the Formstack webhook configuration screen.
Ensure that the Webhook settings are configured exactly as shown above.
4. Return to Inflection to reach the **Submission test** step. Provide a test submission to verify the setup (recommended), or skip this step.
5. Submissions from your Formstack forms will now appear in Inflection.
### Other Commonly Used Providers
Inflection works with any form tool that supports outbound webhooks posting JSON. External setup guides:
* [Typeform](https://www.typeform.com/developers/webhooks/)
* [Jotform](https://www.jotform.com/integrations/webhooks)
* [Formsite](https://support.formsite.com/hc/en-us/articles/360000546194-Webhooks)
* [SurveyMonkey](https://help.surveymonkey.com/en/apply/build/webhook-overview/)
* [Feathery.io](http://Feathery.io)
* [Fillout](https://www.fillout.com/help/webhook)
* [Zoho Forms](https://help.zoho.com/portal/en/kb/forms/integrations/webhooks/articles/webhook-configuration)
* [Form.io](http://Form.io)
* [QuestionScout](https://support.questionscout.com/article/26-webhooks)
* [Paperform](https://paperform.co/help/articles/how-to-use-webhooks/)
## Custom Forms FAQs
Custom form connections default to **Real-time** because form submissions - like demo requests or event registrations - are typically time-sensitive and benefit from isolated, priority processing. If your form handles high-volume batch imports instead, you can switch it to **Bulk** from the **Connection Details** card. Both lanes process data at the same speed; the separation ensures one connection's traffic doesn't affect the other.
This documentation is built and hosted on [Mintlify](https://mintlify.com), a developer documentation platform.